Entry 5 - Photos, Editing and Assignment
Today we were to takes photos of our partner from an equal POV, powerful POV and weak POV. We also learnt about the types of editing and watched a short video of last year's example of our assignment.
Mr Andrew gave us 10 mins for this activity, so we had to kind of rush this activity. The basic knowledge that we had about powerful and weak was: Darker lighting = evil, Low to high = Powerful, High to low = Weak, Light lighting = good and framing.
Equal:
For the equal, we wanted the lighting for each other to be exact, to show that there's no right nor wrong side in these two images. We also wanted it to be seen as if we were looking at each other, from each other's POV. Therefore, we shot one person from one side and the other from the opposite.


There are a lot of things that I would like to change about these two pictures. The first thing that I personally would like to change about these two pictures are the visual space. In the first picture, you can see more background and almost half of the person's body. This is because it was shot as a Medium Shot. In contrast, the picture on the bottom is shot as a medium close up shot. This makes it seem as if she is more important than the one in the first picture. In addition, the girl in the second picture is not centred, but instead a little off to the right. This makes it seem as if she's cornered, as there's less space for her to go to. The other thing that I would like to fix about this is in the first picture. The girl is kind of looking up whereas in the other picture, she is looking straight at the camera. This makes the other girl seem more powerful, as she's forcing a low to high angle shot.
Powerful:
We wanted to show the stairs and the bars in this image to create a leading line that directs the viewers eyes "upwards". The girl is also on the line of thirds, which definitely catches the viewers eyes. Her head is slightly tilted downwards, so it again reinforces the idea of her being powerful. Her body is in a stoic position, which a lot of evil and powerful characters use in movies.
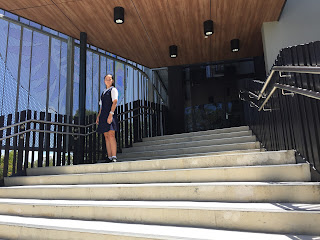 It would have been better if the exposure on this picture was slightly lowered so that it was obvious that she is evil.
Weak:
We wanted to put her head on the line of third again, so we did that. Again, the photo is from the POV of the other girl, which explains why she is on the other side of the setting. Her body position is kind of scrunched, making her seem less powerful. Her shadow is small compared to her body, which is a visual representation of her being weak, again. The leading line is the bar that she's holding. The colour contrast between the girl and the concrete makes her stand out. The shot was shot in a high to low angle, which makes her seem weak.

Mr Andrew gave us 10 mins for this activity, so we had to kind of rush this activity. The basic knowledge that we had about powerful and weak was: Darker lighting = evil, Low to high = Powerful, High to low = Weak, Light lighting = good and framing.
Equal:
For the equal, we wanted the lighting for each other to be exact, to show that there's no right nor wrong side in these two images. We also wanted it to be seen as if we were looking at each other, from each other's POV. Therefore, we shot one person from one side and the other from the opposite.


There are a lot of things that I would like to change about these two pictures. The first thing that I personally would like to change about these two pictures are the visual space. In the first picture, you can see more background and almost half of the person's body. This is because it was shot as a Medium Shot. In contrast, the picture on the bottom is shot as a medium close up shot. This makes it seem as if she is more important than the one in the first picture. In addition, the girl in the second picture is not centred, but instead a little off to the right. This makes it seem as if she's cornered, as there's less space for her to go to. The other thing that I would like to fix about this is in the first picture. The girl is kind of looking up whereas in the other picture, she is looking straight at the camera. This makes the other girl seem more powerful, as she's forcing a low to high angle shot.
Powerful:
We wanted to show the stairs and the bars in this image to create a leading line that directs the viewers eyes "upwards". The girl is also on the line of thirds, which definitely catches the viewers eyes. Her head is slightly tilted downwards, so it again reinforces the idea of her being powerful. Her body is in a stoic position, which a lot of evil and powerful characters use in movies.

Weak:
We wanted to put her head on the line of third again, so we did that. Again, the photo is from the POV of the other girl, which explains why she is on the other side of the setting. Her body position is kind of scrunched, making her seem less powerful. Her shadow is small compared to her body, which is a visual representation of her being weak, again. The leading line is the bar that she's holding. The colour contrast between the girl and the concrete makes her stand out. The shot was shot in a high to low angle, which makes her seem weak.

The leading line between the grass and the concrete is quite harsh, which may direct the viewers attention there. There's also a lot of space between her and the frame, which doesn't really make her seem "WEAK".
It's a shame that we didn't have more time during class, cause Sarah and I couldn't go over our photos and retake them.
The editing techniques that we learnt.
The core editing techniques include:
Cuts
Dissolves ( Cross and Fade (Fades can include fade to/from black/white/colour) )
Graphic Relationships:
A Graphic match is used to continuously transition two successive shots. It's a cut between two shots that juxtapose their graphically similar images. Graphic matches may be based on colour, or prominent objects or shapes between shots.
Rhythmic Editing
A quick editing is a film editing technique that refers to several consecutive shots for a short time. It can be used to convey a lot of information very quickly, or to imply either energy or chaos. It can bring confusion or bewilderment to the viewers. Fast cutting is also frequently used when shooting dialogue between two or more characters, changing the viewer's perspective to either focus on the reaction of another character's dialog, or to bring to attention the non-verbal actions of the speaking character.
A slow editing is when a shot is used for a long duration. This can create tension or pace. It can also make the viewers feel awkward when it's used during an awkward moment of the film. It can also be used in thriller films when a character is creeping behind the main character.
Rhythmic editing is when the relations between shots function to control film pace. I.e; A finger is tapping, then a tap is seen dripping in unison with the tapping. In the cotton club two stories are intertwined. A tap dancer is performing a routine that gets faster and faster while at the same time a gangster boss is being gunned down. The shots are intertwined and the editing becomes faster and faster as the climax approaches.
Spatial Editing
Invisible editing aims to have none of the edits consciously noticed by the viewer so it is never a distraction. It matches spatial and temporal relations from shot to shot in order to maintain continuous and clear narrative action. Shot/Countershot, Shot/Reverse Shot, Eyeline match, Match on action and Crosscutting are some of the examples of Invisible Editing.
Visible editing is the opposite of invisible editing, where the edit is obvious. For example, a visible editing can be when the scene jumps to a different setting.
Temporal Editing
Temporal editing is when the relations between shots function to control time. Flashbacks are used to show what happened in the past. Flashforwards are shown to show events that may happen in the future. Temporal Editing can also be used when shots are edited so that the time between two events can be reduced. Instead of showing every detail, the editor can make a person open the door to the house and then see him walking down the hallways. Montages are also a type of temporal editing which a series of shots used to depict long passages of time is condensed into a series of quick shots. They are often accompanied by music. For example, a weak hero is transferred into a powerful one. Overlapping editing is also another type of temporal editing which is used to create a sense of speed by showing the same event from different angles. They are often used in car chases and explosions.
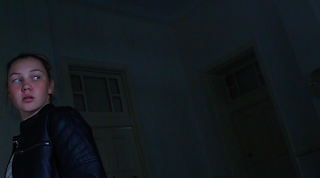
Today we also watched a video from the previous year about the assignment and checked the criteria sheet. The video was about a girl looking for her phone charger, but the message wasn't clear. She didn't show any signs of her phone being low on battery except the time she briefly took her phone out of her pocket to check the screen. The audience however, didn't get to see the screen. There were lots of quick editing which was cool. Overall, Mr. Andrews told us that we need to be clear that we're trying to find something from the start of the film.
In addition to the idea I had last lesson, I was thinking of putting quick edits to other people's name badges and then a slow edit on her chest, where the badge is missing. This will further show the audiences that she's searching for her name badge, which is not there. It'd be great if I also zoom in on the character's face after her realisation that nobody is caring about her.
That's all we did this lesson.

Comments
Post a Comment